

Making a six layer rainbow cake can be quite an endeavor, especially if you’re making it from scratch. Hopefully this recipe helps break it down to make it as easy as possible. Disclaimer: This post contains affiliate links.


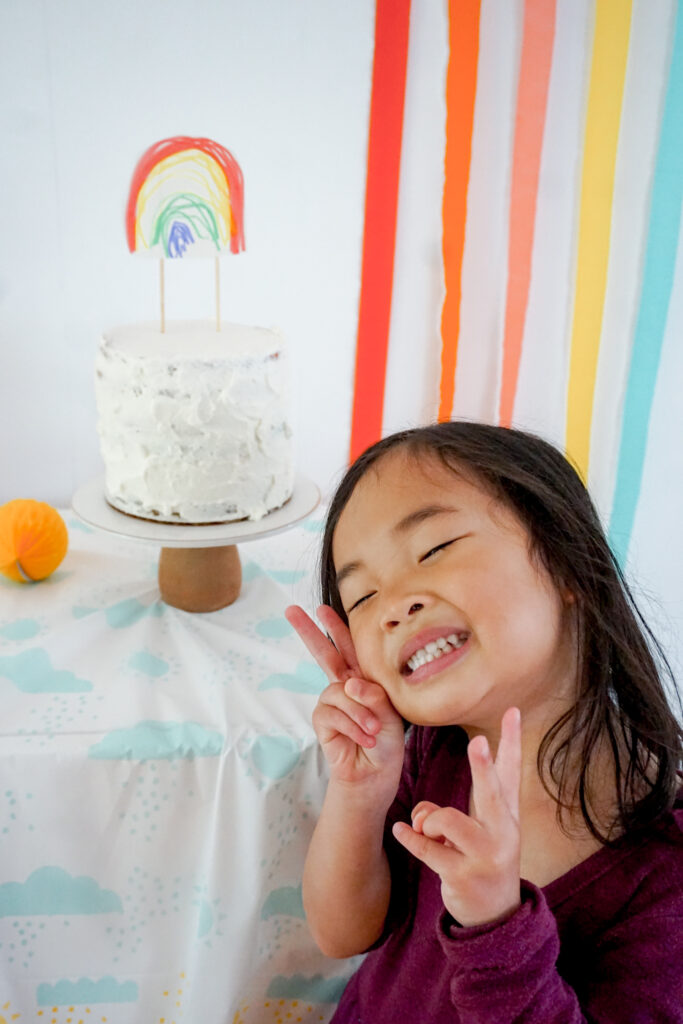
Um, hi! This post is literally a year late. I made this rainbow cake for my daughter’s fourth birthday, and she’s now turning five. Oops!
The truth is that this cake was a lot more effort than my usual cakes. And thus… the recipe was a lot more effort to write up. I’d also like to be super transparent and say that since that fourth birthday party, I have not remade this cake. I’m just a low-effort baker.
But I can’t deny my kids their birthday cakes! And so if you’re like me, and you overcommit to your children but you don’t actually want to make anything too fussy, this recipe is for you.

Asian Bakery Cake Hack
As much as I love the ease of a box mix, I pretty much only want to eat Asian bakery cakes. If you’ve been to a modern Taiwanese or Japanese bakery, you’ll have seen the fluffy and light textured cakes frosted with lightly sweetened whipped cream.
Well, those cakes are actually called chiffon cakes in Western bakeries. And they’re made by whipping egg whites separately to stiff peaks and then folding them into the rest of the batter that’s made with the yolks, flour, oil, and other ingredients.
Given the lazy baker I am, I don’t really want to have to go through the extra step of separating eggs. So this recipe is a little bit of a way to cheat that. As I was trying various cake recipes I’ve found on the internet, I noticed that recipes that beat eggs with sugar end up with a similar fluffy texture as an Asian bakery cake. It’s not quite as bouncy as a chiffon cake, but it’s close. And it’s less work!
Making a Six Layer Cake
If you’re normally a snack cake kind of gal, making a layer cake may seem intimidating. I normally top out at three layers, so six layers was a stretch even for me.
But although it is a little more time consuming, it’s really not that bad. You just put frosting, then cake, then frosting, then cake, over and over. When it comes down to it, that’s all it is.
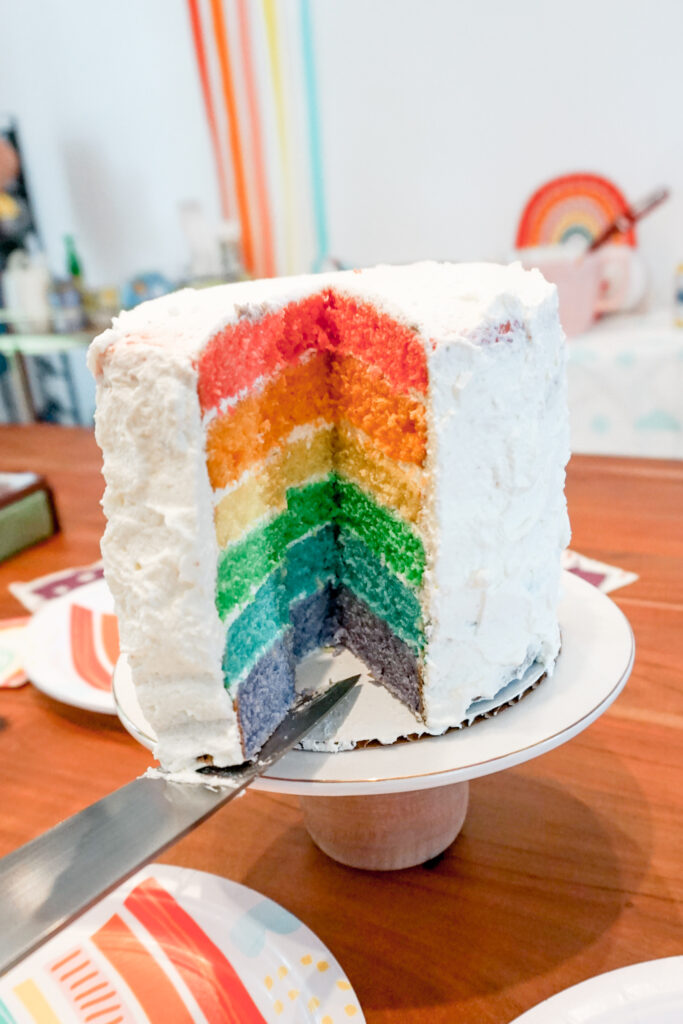
Now, a necessary tool for this is going to be some wood dowels. A six layer cake is just too tall to stand on its own, and without the dowels, the top layers will slip and slide right off. Or your whole cake will just collapse. We’ve all seen those episodes of Bake Off. Let’s avoid the heartbreak.
Some non necessary tools that I recommend because they’re helpful: a cake turntable and an offset spatula. You don’t need these things to frost a cake, but they make it sooooooo much easier. If you plan on frosting cakes even just once a year for birthdays, I think it’s worth the purchase.
Whipped Cream Frosting with Pudding Mix
Asian bakery cakes typically have some sort of whipped cream frosting. I love it. It’s light, it’s not too sweet, and it pairs well with the fluffy cake texture. But the downside of whipped cream is that it can melt or deflate fairly quickly. That makes it especially hard to use to frost layer cakes.
BUT HERE’S THE KEY! I learned this quite recently, that if you add a tablespoon or two of instant pudding mix powder to your heavy cream it stabilizes it! I used to use recipes that incorporate powdered gelatin to get the same effect, but you have to go through all the steps of blooming the gelatin and measuring out how much you need… Using pudding mix is sooooo much easier. Just do it. It’s great.
More Cake Recipes
Looking for more (and easier) cake recipes? Check these out:


6-Layer Rainbow Sponge Cake
Ingredients
For the Rainbow Sponge Cake
- 2 cups sugar
- 4 eggs
- 1 cup flavorless oil, such as corn or canola
- 1 cup milk
- 1 tsp vanilla extract or other extract
- 2 cups flour
- 1 tsp kosher salt
- 1/2 tsp baking soda
- 2 tsps baking powder
- food dye in rainbow colors
For Whipped Cream
- 2 tbsp sugar
- 2 cups heavy cream
- 2 tbsp instant pudding mix
Instructions
To Bake the Rainbow Sponge Cake
- Preheat oven to 350 degrees F. Grease and line six 6" round cake tins
- Beat eggs and sugar until batter is pale, fluffy, and holds its shape in ribbons just slightly when dripping off the beater.
- Beat in oil until completely homogenous.
- In a separate bowl, mix milk and extract together.
- In another bowl, mix dry ingredients together until well combined (flour, baking soda, baking powder, salt).
- Alternate adding liquid and dry ingredients into your batter, mixing or folding very gently to preserve the air bubbles.
- Separate batter evenly into six bowls. To be the most precise, use a kitchen scale.
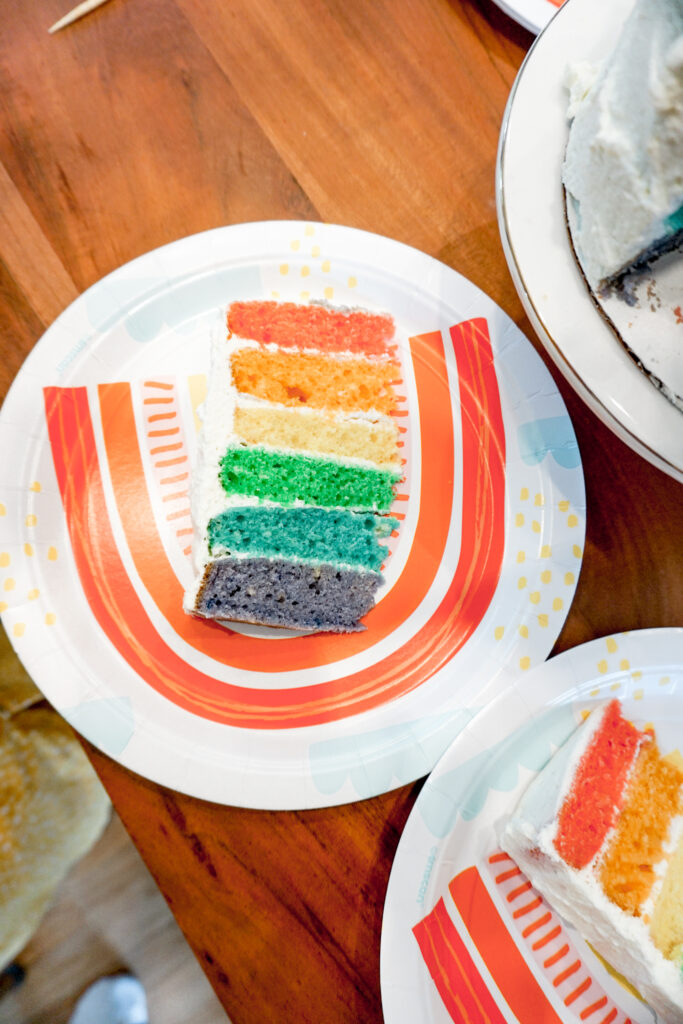
- Add a drop of gel food coloring to each bowl of batter (red, orange, yellow, blue, green, and purple) and fold the batter to incorporate.
- Pour each dyed bowl of batter into its own 6" cake tin. If you don't have enough cake tins, you can cover batter with plastic wrap and let it sit on the kitchen counter until the first batch of cakes is done baking.
- Bake in preheated oven for 18-20 minutes, or until a toothpick inserted in the center comes out clean and the cake is springy to the touch. Allow to cool completely before frosting.
For the Whipped Cream
- Add sugar, pudding mix, and whipping cream to a stand mixer fitted with a whisk attachment (or use electric beaters). Beat until the whipping cream holds stiff peaks.
- To frost the cake, I recommend using a 6" cake board, a turntable, and an offset spatula. Place the cake board on top of the turntable.
- Add a smear of cream on the cakeboard and place one layer of cake on top. Add about 1/3 cup frosting on top of that layer. Smooth out with the offset spatula, turning the cake as needed to get a flat surface.
- Repeat with the other layers of cake.
- You should now have six layers of cake with about a 1/4 inch layer of frosting on top of each one. Using the offset spatula, smooth any excess frosting sticking out from in between your layers along the sides of the cake.
- Add more whipped cream to the sides of your cake. Holding your spatula flat against the side of the cake with one hand, slowly spin the turntable with the other hand in order to even out the whipped cream along the sides.
- When all sides of your cake are covered in a thick layer of whipped cream, use your offset spatula to swoosh some rustic swirls.
- Because this is a six layer cake using slippery whipped cream, you'll want to dowel your cake to prevent it from falling over. I stuck two bamboo BBQ skewers all the way through to the bottom of the cake and taped a rainbow decoration (drawn by my daughter) to the top. If you don't want to use a hanging decoration, you can cut the dowels/skewers to the level of the top of the cake and cover with frosting.
- Keep leftover cake in the fridge in an airtight container or wrapped in plastic.