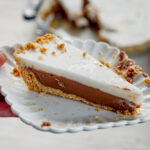
Super Easy Chocolate Haupia Pie
This chocolate haupia pie could not be any easier. It's a perfect Hawaiian dessert to bring to a potluck.
Servings: 1 9" pie
Ingredients
Crust
- 1 1/2 cups graham cracker crumbs
- 4 tbsp unsalted butter
- 1 pinch salt
Filling
- 2 13.5 oz cans coconut milk
- 6 tbsp sugar divided in half
- 6 tbsp cornstarch divided in half
- 1/2 cup water divided in half
- 4 oz chocolate, chopped (any kind)
Optional Whipped Cream Topping
- 1/2 cup heavy cream
- 2 tbsp sugar
Instructions
For the Crust
- Melt the butter and mix with graham cracker crumbs
- Press clumps of crumbs along the bottom and sides of a 9" pie tin to form the crust
- OPTIONAL: Bake for 10-15 minutes at 350 degrees F to get an extra toasty and set crust. The crust will be fine without being baked as well. Set aside to cool while you prepare the filling.
For the Filling
- Mix 3 tbsp of cornstarch, 3 tbsp sugar, and 1/4 cup water to form a slurry.
- Pour one can of coconut milk in a saucepan and heat on medium heat until mixture begins to steam but is not bubbling.
- Pour cornstarch slurry into the coconut milk, continuously whisking to avoid forming clumps. Coconut milk should thicken very quickly. When it reaches a gravy like consistency, turn off the heat and pour into a heatproof mixing bowl.
- Stir 4 oz of chocolate into the warm coconut milk mixture until chocolate is melted and fully mixed.
- Pour chocolate coconut mixture into prepared crust. Smooth out the top with a knife if needed. Place the pie in the fridge or freezer to cool. I recommend waiting at least 30 minutes for the top of the chocolate layer to set, but I've been successful with as little as 10 minutes when working very carefully.
- Repeat steps 1-3 to make another haupia batter.
- Very very carefully pour the haupia on top of the chocolate layer, trying to keep the haupia sitting on top of the chocolate instead of piercing straight down to the bottom.
- Place the pie into the fridge to set completely. If you are not topping with whipped cream, you can leave the pie uncovered. Otherwise, plastic wrap directly touching the top coconut layer will prevent a skin from forming as the pie cools.
- Let pie set until firm, at least 3 hours but preferably overnight.
For the Optional Whipped Cream Topping
- Just before serving, place heavy cream and sugar in a mixing bowl.
- Whip on high speed until stiff peaks form.
- Place whipped cream over pie and smooth out over the surface with a spoon or knife.
- Optional: decorate top with chocolate shavings, sprinkles, or shredded coconut before serving.
Notes
- In a previous version of this recipe, I omitted the water and used some of the coconut milk to form the slurry. I've found that some brands of coconut milk that have added thickeners would get VERY thick very fast when I used this method, but brands that are made with pure coconut and water (e.g. Trader Joe's) only work well this way. If you'd like to omit the water feel free, but just be careful not to let your haupia thicken too much on the stove or it won't have a pourable consistency.
